Showing posts with label amd. Show all posts

Monday, November 30, 2009

K10STAT AMD Griffin Processor UnderVolting Guide


FAQ

Why UnderVolt?

Because if a lower voltage can sustain your clockspeed undervolting preserve battery life and reduce heat generated without affecting your CPU performance at all!!

0 performance handicap with less heat output and longer battery life!! (Your yield may vary)

If it is so great why manufacturers don't undervolt?

Because they create processors in bulk you can't expect them to test and undervolt every single processor!

So they simply take the a slightly higher approximate stable voltage and burn the same value into every chip of the same family!

Will it spoil my processor?

No it won't, because it doesn't involve making it hotter.
In non-biological system usually heat destroys and cold preserves.
During testing, BSOD (Blue Screen of Death) is common but after a restart the Processor Voltage is restored to original value.
After finalising the stable voltages then you set the program to run every startup.
I strongly recommend testing ALL THE P-STATES before setting up the final values so your computer will not crash when you are doing your important work (or in the middle of gaming).

Why don't you use Windows Startup to run it?

Microsoft seems to be encouraging running start-ups through Task Scheduler, not to mention Task Scheduler allows good control over program automated execution.

Which Processor is it for ?

AMD Griffin Series Processor, ZM,RM,QL,SI and the new M3XX, M5XX, M6X0 Turion II Processor series.

But I am using Intel Processors?

For Core 2 Duo Processor you can use RMClock, if you are using 64bit Operating System you might need to google for 64bit libraries to replace some of the 32bit libraries. You can google it up.
For Core i3/5/7 users, I haven’t heard of any undervolting tool but I personally seen in the BIOS/EFI ACPI P-State Control is Unlockable, so BIOS/EFI modding is a possible solution.

But I am using AMD TL Series and below Processors ?
Use RMClock as well refer to “But I am using Intel Processors”.

Getting Started


Firstly download K10STAT from here.
I Extracted it to C:\Program Files\K10STAT (K10STAT is 64bit and 32bit capable as well)
Configure K10STAT


When you run K10STAT you should see the menu above.
You can set a maximium of 5 Profiles.

FID: The multiplier for the Processor
(FID doesn't work in AMD Mobile Processors because they are multiplier-locked)

DID: The P-State of the Processor
Note all Processors supported by K10STAT uses K10 Power Design


CPU-Voltage

That is what we are interested in.
To set the voltage for P0 simply select P0 and select the corresponding voltage and apply.
Remember: Min 0.75 V Max 1.2 V!
Caspian CPUs maybe able to run lower than 0.75V
For me I tested -0.05 is the Max Stable voltage for each default state any higher it BSOD!

Up%:

This is the amount of CPU usage load before the processor increase P-State to meet the minmium load requirements.
Currently it is set at 60% meaning it will switch from P2 to P1 when processor detect 60% CPU load and the same applies from switching from P1 to P0.

Down%:

It is basically the opposite of Up %
This is the amount of CPU usage load before the processor decrease P-State to meet the minimum load requirements.

Up (milliseconds):

It is the time the processor takes to switch from one P-State to the next higher P-State.

Down (milliseconds):

It is basically the opposite of Up.
It is the time the processor takes to switch from one P-State to the next lower P-State.
After you have set suitable values (-0.05 recommended on first try).


Use Windows Processor Power Management to test different levels.

Use 4 Windows as shown above, to monitor all the P-States so it is more convenient to assess the values and monitor the states.

First remember to enable K10STAT Clock Control
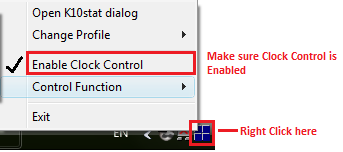


To test simply click on the Core of the P-State immediately the Processor will assume the P-State.


Test each P-State by running Intel Burn In (Google and Download) or any suitable CPU loading tool.

For me the voltage values that passed Intel Burn In test are 1.075V, 0.850V and 0.750V.

At 1.025V, it BSOD after 2 mins.
At 1.0372V-1.050V it produced the wrong result.

Test all P-States you have modified so it won’t crash whenever the CPU switches to any of them.

To pass LinPack, the result calculated by the CPU must be consistent.
After you have affirmed the stable voltage values then you may proceed to set it to start automatically.

Setting K10STAT for StartUp

Open Task Scheduler by accessing Start Menu\All Programs\Accessories\System Tools\Task Scheduler

Create a Task


Alternatively you can make it run as a SYSTEM task (as shown below)


If you want the K10STAT icon to appear in the systray run the program under your username.
If you run it as SYSTEM account the program will run too but it will not be visible.
Click "Change User or Group" then Enter "System" then choose "Check Names" then select OK.


or you can create it as a startup process as shown below. (RECOMMENDED because it will run before a logon is required)


**Please note a file called K10stat.dat containing the undervolt settings will be created in the C:\Windows\System32 folder because it is the default path for admin rights unless you changed the "Start In (Optional)" parameters, the setting just under the "Add Arguments (Optional)" parameters as shown below.


The program will load the settings from K10STAT.dat so make sure all the changes are overwritten to the file. When you launch K10STAT manually a new K10STAT.dat will be created in C:\Program Files\K10STAT which Task Scheduler WILL NOT LOAD.
It will only load the K10STAT.dat in C:\Windows\System32 unless you change the "Start In" parameters to "C:\Program Files\K10STAT".

If you do not specify “Start In” parameters, the file “K10stat.dat” will be created in C:\Windows\System32 (Default Administrator Path) as shown below.


The following arguments are available (Source:http://dsus4.blog126.fc2.com/blog-entry-3.html)

Command Line Option
-lp:#(1-5) - load profile#(1-5) and write to MSR.

-nw - Start K10stat with No Window.

-ClkCtrl:#(0-4) - Enable Clock Control by K10stat.
0: No Control
1: Control clock of each core.
2: Control clock of all cores together (Criterion is most loaded core).
3: Control clock of all cores together (Criterion is average of all cores).
4: Control clock of all cores together (Criterion is least loaded core).
If you set -ClkCtrl:2 you get better performance at the expense of more power consumption.
Because Windows proceed on the assumption that cores are unganged by default.

AMD K10 Processors were designed originally to use unganged mode to conserve power.

-StayOnTray - use this option with -nw for Clock Control Mode.(Note after a sleep if the CPU registers are resetted, voltages will revert to default, hence you need -StayOnTray to ensure it is always running in the background)
e.g.Target:
"C:\Program Files\K10stat\K10STAT.exe" -lp:1 -ClkCtrl:2 -StayOnTray -nw


Finally you can Control your CPU using the K10STAT Systray if you enabled -StayOnTray manually as well.


-ClkCtrl:#(0-4) - Enable Clock Control by K10stat (Refer to above).
0:No Control

1:Control clock of each core.
UnGanged means each CPU Core #0 & #1 operates independently of each other so at any one time their frequency and DID could be different.(This is the original intent of the design of the Turion Chips as they are given different power planes.)

2:Control clock of all cores together (Criterion is most loaded core).
This means the CPU will raise/drop the DID of Core #0 & #1 together when it detects the one of higher Core has reached the criteria for a Frequency boost/Throttle Down.

3:Control clock of all cores together (Criterion is average of all cores).
This means the CPU will raise/drop the DID of Core #0 & #1 together when it detects the average of both core has reached the criteria for a Frequency boost/Throttle Down.

4:Control clock of all cores together (Criterion is least loaded core).
This means the CPU will raise/drop the DID of Core #0 & #1 together when it detects the one of lowest Core has reached the criteria for a Frequency boost/Throttle Down.


A new function called Lock-P-state is available in new versions of K10Stat.

It is another way you can lock the P-state for P-state testing again you should enable Clock Control before performing the P-State Testing.

Down Core refers to switching off 1 of the Cores either Core0 or Core1.

Testing

__________________________________________________________________


Original Factory Default Settings
_________________________________________________________________________


UnderVolted 1.075V
In Unganged Mode
__________________________________________________________________


UnderVolted 1.075V
In Ganged Mode (Based on highest core)
__________________________________________________________________

Thats All !

AMD Technical Documentation Regarding Turion Processors here

(Contains Temperature Limits P-States and Voltages)

Sunday, August 16, 2009

ACPI Problems in Windows 7

(Error1

: The embedded controller (EC) did not respond within the specified timeout period. This may indicate that there is an error in the EC hardware or firmware or that the BIOS is accessing the EC incorrectly. You should check with your computer manufacturer for an upgraded BIOS. In some situations, this error may cause the computer to function incorrectly.

Result of Error 1
The speed of processor 0 in group 0 is being limited by system firmware. The processor has been in this reduced performance state for 3 seconds since the last report.

What does this means?

It means ACPI has detected the temperature has exceeded the threshold in the PSVT method in the DSDT contained in the BIOS. Therefore ACPI will automatically throttle down the CPU to lower states so temperature will drop. Hopefully.

I revised the DSDT file need further testing to confirm if the newer DSDT fixes the issue(Note: For Aspire 4530 only other Computers need their own DSDT).


Thursday, June 11, 2009

OverClocking from RM-72 to RM-74

Edit:
The following does not work although CPUZ claims it works, it doesn't show any difference in Intel burn in test.
Probably the reason is due to AMD Factory Locked Multiplier so FID doesn't work.

I tested a while ago stable voltages that pass LinPack are
1.075V @ 2100MHZ
0.875V @ 1050 MHZ
0.750V @ 525 MHZ
What I actually believe is RM-72 is actually RM-74 crippled by 100MHZ
Based on the Processor Specification RM-72 is identical to RM-74 lest the Clock Frequency.
Even the TDP is the same.
So I used K10STAT to increase the FID to 14 from 13.
It passed all LinPack tests without the need to increase the voltages.
So now my RM-72 became RM-74.
1.075V @ 2200MHZ
0.875V @ 1100 MHZ
0.750V @ 550 MHZ
You need to pass-ClkCtrl:2 argument to overclock.

Sunday, June 7, 2009

UnderVolting AMD Griffin Processor


Edit:
You can read continue to read this as a guide but this is a better tool IMHO.

I chanced upon this site : http://amd.goexchange.de/

This is a new Tool designed to undervolt AMD Griffin ZM/RM/QL/SI Processors.
The program is free for home users (However you are encouraged to donate as it is a lot of work) and it is not free for business users


1)Why Undervolt?
In short conserve power (Battery Life) and reduce thermal emission (Overheating) with no effect on Computing Performance for more info check on the previous link.

2)For Intel Processors and AMD TL and older Series Mobile Processors RMClock is able to overclock them.

However no tool was available to underclock CPU until this tool was release.

How to use?

The documentation on the site is very lengthy and rather confusing.
I was confused first time I read it.

A very simplified guide as follows:

1) Create a folder in Program Files.
eg. Create C:\Program Files\GriffinControl

2) Download the files required (scroll down a bit you should see 2 files each for 32bit and the other 2 files for 64bit) and extract them to the folder you created in 1).

3) Open the GriffinControl_config.xml with notepad (the author provided a skeleton configuration file) .

You will only be looking at the following column and the values in bold
Note QL/SI Processor only should have 2 pstate number (I think it is 0 and 1 , no 2 not sure about this).
How do you go about setting voltage?

Basically AMD ZM/RM Series Processors has 3 Power State.

A full state runs at max frequency when you need the processing power it throttles up to maximium frequency giving you the computation power you need.
This is pstate number 0 which is 100% of the total CPU Power.
pstate number 1 is 50% of the total CPU Power.
pstate number 2 is 25% of the total CPU Power.

If you set too low a voltage the CPU will not run stably due to unsufficient voltage and cause BSOD.

For QL/SI Processor you only have 2 pstate, 0 & 1.
pstate number 0 which is 100% of the total CPU Power.
pstate number 1 is 50% of the total CPU Power.

How do you know the default voltages for the CPU?
Either you run CPUZ as shown by the picture at the end of this entry.
Then use Vista Processor Power Management to throttle at different percentages to find the 3 or 2 voltage level depending on what processor you have.
If you are not sure you can leave a comment at the end of this entry I will recommend values for you to try.
Another way is to refer to the config file provided with the downloads.

4)Reference this table for the list of Voltage ID.
eg. The value 42 as shown above translate to 1.025V and so on.

(Note the lowest VID is 64 no lower values will work and value above 36 can fry your processor )

Edit the values to the voltage you want.

For my RM-72 Processor, I tested 64,52 and 42 is the most extreme stable values.
Which translate to: 0.750V, 0.900V and 1.025V respectively.
Original Voltage: 0.800, 0.950V and 1.075V respectively.
A difference of 0.05V, 0.05V,0.05V , any higher it BSODS

Change the values accordingly and save.

6)Run GriffinControlService_32bit.exe for 32bit Windows and GriffinControlService_64bit for 64bit Windows.
Follow instruction and create the Windows Service if you encounter an error message you did something wrong.
Go to Services Menu and Start the Service if you ever want to delete the service you must stop it first (using the same manner, stopping it instead of starting it)
If you are doing testing make sure the service is set to manual start instead of Automatic so after BSOD it will default to original value and not BSOD repeatedly I learned this the hard way.
If you did not listen to me and it BSOD repeatedly, when it is possible to get to Windows Either start with last saved configuration or try to switch to Power Saver Mode in Vista Power Plan so it will not cause BSOD again.Don't worry no physical damage is done to the processor.

7) Run a CPU stressing Tool like Intel Burn In make sure no BSOD happens when running the tool so the voltage is stable. Use the Vista Processor Power Management to test the different Power States.
Set to auto start service if you are happy with the final setting.

This program is very well created especially when the author implemented it as a windows service, so donate to the author if you are able to.

Special Thanks to the author, now my CPU Voltage Temperature Dropped by a lot at max frequency.

Proof that it works!

Edit: The Service hung on Vista and created a Windows Event Log (no error message) so I set it to Delay Start and the problem went away.

At the end of the process the result of undervolting implies AMD chips are indeed overworked in order to catch up to Intel Processor Performance, the undervolted amount of 0.05 at max frequency implies this.
Any further undervolting results in BSOD.

Just encountered another BSOD raise voltages by 0.025

Finally whenever you encounter a hardware BSOD (read the message on the BSOD) just raise the voltage by 0.025.
Eg. when you BSOD on youtube you probably need to raise p-state 1 and p-state 2 by 0.025
My guess is when the CPU changes state from 2 to 1 it switches too quickly therefore insufficient voltage to support the boost hence it BSOD.

Friday, May 29, 2009

AMD Processor Driver and Dual Core Optimizer For WinXp

Important

Laptops using AMD Processors which is operating on Windows Xp please note you have to install the following:

AMD Processor Driver Version 1.3.2.0053 for Windows XP & Windows Server 2003 (x86 and x64)
Allows the system to automatically adjust the CPU speed, voltage and power combination to match the instantaneous user performance need. This package is a user friendly localized software installation of the driver designed for end-users. This driver supports AMD processors on Windows XP SP2 and Windows Server 2003 SP2 x86 and x64 Editions.


And

AMD Dual-Core Optimizer Version 1.1.4 (Mirror Download)
The AMD Dual-Core Optimizer can help improve some PC gaming video performance by compensating for those applications that bypass the Windows API for timing by directly using the RDTSC (Read Time Stamp Counter) instruction. Applications that rely on RDTSC do not benefit from the logic in the operating system to properly account for the affect of power management mechanisms on the rate at which a processor core's Time Stamp Counter (TSC) is incremented. The AMD Dual-Core Optimizer helps to correct the resulting video performance effects or other incorrect timing effects that these applications may experience on dual-core processor systems, by periodically adjusting the core time-stamp-counters, so that they are synchronized.


It is required to save power and reduce the thermal exhaust

The reason it is required is at the time of Windows Xp release these Drivers were not included

Windows Vista users just need to install AMD Dual-Core Optimizer Version 1.1.4

There has been some question if AMD Dual-Core Optimizer is really needed.
This is what I found out in the Readme.rtf in AMD Dual-Core Optimizer :

---Improvement and Fixes---

Version 1.1.4

* Fixed installation issue on Windows Vista.

---System Requirements---

* Microprocessor: AMD Athlon™ 64 X2 Dual-Core Processors

This software installs and operates under the following operating systems

* Microsoft® Windows® XP

* Microsoft Windows Server 2003

* Microsoft Windows Vista

The rationale is if it was not needed in Vista why would they fix it?

Thursday, November 6, 2008

Does AMD Optimizer Actually Speed up the CPU?

Ok here is what AMD Claims that their Optimizer do:

AMD Dual-Core Optimizer Version 1.1.4 - The AMD Dual-Core Optimizer can help improve some PC gaming video performance by compensating for those applications that bypass the Windows API for timing by directly using the RDTSC (Read Time Stamp Counter) instruction. Applications that rely on RDTSC do not benefit from the logic in the operating system to properly account for the affect of power management mechanisms on the rate at which a processor core's Time Stamp Counter (TSC) is incremented. The AMD Dual-Core Optimizer helps to correct the resulting video performance effects or other incorrect timing effects that these applications may experience on dual-core processor systems, by periodically adjusting the core time-stamp-counters, so that they are synchronized.

AMD Optimizer in Windows Runs as a Service amd_dc_opt.exe

I tested the difference by disabling the service to simulate without Optimization & reenable the service to simulate with Optimization
The results are as shown below using PC Wizard 2008 as a benchmark available here


Benchmark Result With AMD Optimzer using CPU Calculations


Benchmark Result with AMD Optimizer Overall Performance


Benchmark Result without AMD Optimzer using CPU Calculations


Benchmark Result without AMD Optimizer Overall Performance

From the result it can be seen that there is no real optimzation for CPU Calculation and Overall Performance
For Overall Performance the performance change is a 1.5% drop
For CPU Calculations the performance change is a 7.3% drop
It seems that by disabling this feature processing power would be ramped up

However do note that from the Overall Performance Chart
The video performance went up to 2.4% when optimization is enabled
And note the description from AMD Site:
(The AMD Dual-Core Optimizer helps to correct the resulting video performance effects or other incorrect timing effects that these applications may experience on dual-core processor systems, by periodically adjusting the core time-stamp-counters, so that they are synchronized.)

So it seems that the Optimizer did really perform as expected however CPU scores are affected as a result and many complains was the increase in heat generated from the system when optimzer is enabled.
My opinion is that a small increase in performance is not a great exchange for the heat generated that can potentially damage the system and cripple the CPU
Moreover I personally do not play games frequently I will probably keep out this software for a while.