Saturday, February 21, 2009

Changing the Acer Arcade Shortcut

While surfing the Windows Registry (You must be thinking that I am weird =P) yesterday
I found something interesting
It is actually possible to redirect the shortcut button to other Applications


For example by editing the "command" value under the "My Aspire" Registry Folder
I actually redirected the Acer Arcade Shortcut to Windows Media Player "wmplayer.exe"
Now Pressing the Acer Arcade Button Located above the Wireless Button will launch Windows Media Player
  1. The Command Value Sets the location of the executable to be launch
  2. The Command Types enable you to create a label that will show when you press the shortcut key
  3. You need to create a Label to enter the Application name or it will default to "Arcade" ON my case I attached it to Windows Media Player (because I don't play the lousy Acer games)and set the Label to show Windows Media Player

Thanks to expertester for the pictures =)
http://expertester.wordpress.com/2008/07/18/acer-aspire-4530/

Tuesday, February 17, 2009

Other Sites Regarding Acer Aspire 4530

A great site containing benchmarks and information about Acer Aspire 4530
http://expertester.wordpress.com/2008/07/18/acer-aspire-4530/
Authored by Expertester
Another site containing detail comparison about Acer Aspire 4530 and its predecessor Acer Aspire
4520G, unfortunately it is not in English =(
http://rseiub.blogspot.com/2008/09/review-acer-aspire-4530.html

How To Activate Acer Hidden Partition

Note: If you have Empowering Backup installed please burn the Disk Images before continuing as it is always good to have fall backs

The story goes:
You heard that Vista is slow and lousy so you have decided to "downgrade" to Windows Xp
So you happily install Xp and delete the original system partition and install a new Xp partition
However you smartly left the recovery partition intact.

A few week later you suddenly felt like trying out Vista
However to your horror you couldn't
You tried the famous Alt-F10 to activate Acer Disk to Disk Recovery (D2D) but it doesn't work although the recovery partition is fully intact
You wonder why?

The reason is the original boot record has been overwritten by the Windows Xp you installed over the special original Acer/Vista one so there is no way the boot record will activate recovery.

So I will show you how to activate the Recovery Partition in a few simple steps:

Before you proceed make sure you backup all your important data first

Step 1:
Download PTEDIT32 from here
PTEDIT is a special disk utility to re-mark partition to another type so it becomes bootable
(It should work on all 32bit Windows OS I did not try it on a 64bit Windows)

Step 2:
Extract it to a folder and Right Click run it with Administrator Permission otherwise it will not run (Xp users ignore the right click)
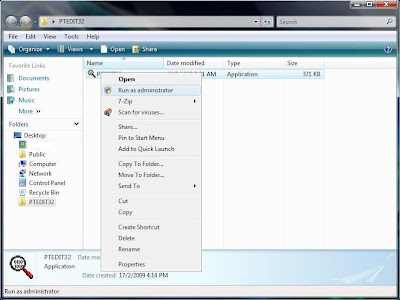


Step 3:
Look at the first entry that is your hidden partition PROVIDED YOU DID NOT ACCIDENTALLY DELETE IT if you did, I recommend you look here instead.
To double confirm check the size make sure it is small like the screenshot
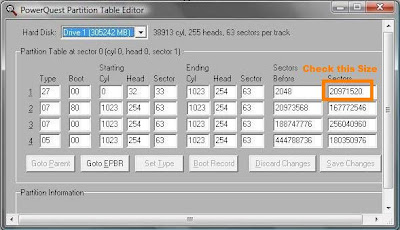


Step 4:
Change the partition type to 07 from 27 (If the partition type is of another value, change to the same type as your system disk C:\)
Then make the changes.Reboot to take effect.
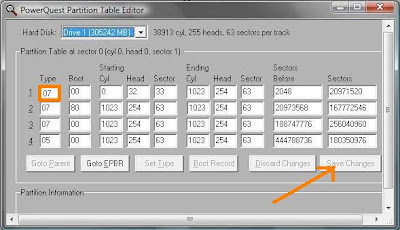


Step 5:
Open Control Panel>> Administrative Tools>> Computer Management>> Disk Management

Step 6:
Mark the partition as Active
Then Reboot disk recovery will start automatically
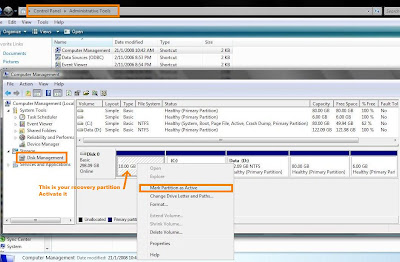

Please remember to burn a copy of the factory default image and driver disk as a backup after that using Empowering Backup, if you haven't already done so.

Alternatively you can do this

Using a command line

  1. Open Command Prompt. (Right Click "Run As Administrator" For Vista)
  2. Type:
  • diskpart
  1. At the DISKPART prompt, type:
  • list disk
  1. At the DISKPART prompt, type:
  • select disk n (In this case it is disk 0)
  1. At the DISKPART prompt, type:
  • list partition Make note of the number of the partition that you want to mark as active.
  1. At the DISKPART prompt, type:
  • select partition n (In this case it is partition 1)
  1. At the DISKPART prompt, type:
  • active
  1. Reboot your computer
-From Technet Microsoft

New:

If you can't even boot into Windows, simply use another working computer download gpart iso image.
Burn to CD as an disk image you need special burning tools like Nero or Roxio.
Then boot from CD you burn by entering BIOS (F2 or Delete usually) select CD-DRIVE as the first boot device save and exit.
If you want to recover your data, plug in an external harddisk and start saving your information.
Then you should see something like this if you try to manage partition in gpart.
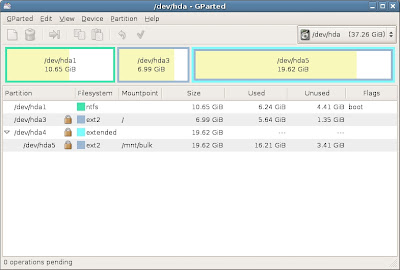
Assuming the first partition is your recovery partition, simply right click on it, select manage flags on the recovery partition.

Select it as "boot" then restart.


Word of Warning
Upon restart the recovery process will start immediately if you did not backup your data all is lost.

Monday, February 2, 2009

Maximising Vista Indexing

For those Tech Savy readers you might have heard of advices such as turning off Windows Xp Indexing Services
This is true for the old Indexing Search feature for Windows Xp
The new Indexing feature in Vista is a much improved feature
It is also available for Windows Xp by a different name Windows Search 4.0
For Windows Xp users you need to download it here

You can speed uo performance by making Windows Search Index only Important & Critical Folders
Here is how to do it:


You need to add C:\Windows and C:\Program Files to the list of Index Location.

(If you have a lot of Programs installed do not index C:\Program Files as it will cause high harddisk activity.)

So Windows will be able to locate files for launching or boot much faster


After that you need to let Windows idle so it will start indexing all locations
After Indexing is complete you are done !

Secure Delete

If you want to erase information on Windows I have a tool to recommend
It is Secure Delete from Sysinternals
Sysinternals Tool Suite is now part of Microsoft
Secure Delete is a free data erase program coded by Windows Guru Mark Russinovich

The advantages of Secure Delete is
  1. No installation required
  2. Part of a Windows OS troubleshooting suite
  3. It is free
  4. It is very easy to use however there is no fanciful GUI everything is done via command line
  5. It is a Microsoft Product so no compatibility issues
First go http://technet.microsoft.com/en-us/sysinternals/default.aspx
I have linked Secure Delete software directly here
Or you can download the entire Suite (Inclusive of other tools) here

Download & extract to a folder like (eg.C:\Program Files\SysinternalsSuite)

To add Secure Delete to Command Line do as follows:


Note: You need to ensure every entry is delimited by a ";"
As shown below
;C:\Program Files\SysinternalsSuite;

To use Secure Delete to delete files
  1. Select Command Prompt or Type "cmd" in Run
  2. Right Click "Run as Administrator"
Note:
You specify -p X where X is the number of times to overwrite the file so it can't be recovered

To clean the harddrive free space do as follows:


Again you can specify how many time you want to clean your C:\ by adding "-p X" to the command

Using SDelete

SDelete is a command line utility that takes a number of options. In any given use, it allows you to delete one or more files and/or directories, or to cleanse the free space on a logical disk. SDelete accepts wild card characters as part of the directory or file specifier.

Usage: sdelete [-p passes] [-s] [-q]
sdelete [-p passes] [-z|-c] [drive letter]

-cZero free space (good for virtual disk optimization).
-p passesSpecifies number of overwrite passes.
-sRecurse subdirectories.
-qDon't print errors (quiet).
-zCleanse free space.

Enjoy =)

Sunday, February 1, 2009

How to dismantle Acer Aspire 4530 (And Fix The WebCam Problem)

If your WebCam sometimes works and sometimes doesn't
Chances it is due to the lose wiring of the WebCam USB Cable
When you open/close the lid the Cable loses connection

To fix it you have to dismantle the front panel (There is no tearing of warranty sticker in the process)

Edit: Now I am trying a new solution 
It is actually very simple 
Use the Bison AP Driver instead of SuYin 
It works better as shown here.

The full guide to dismantling Aspire 4530 is available here

The front panel is boxed in blue


This is how to dismantle front panel

  1. Unscrew the screws circled in red
  2. Gently using a flat head screw driver gently lever the clips boxed in green
Additional tips
If the rubber pads boxed in blue drops out

Do not panic and send back to the service centre
They are attached to the laptop using double sided adhesive tape
Simply clean the surface and replace the pads using new double sided adhesive tapes

  • You should see a gap between the front panel and the body of the laptop

  1. Using the flat head screw driver detach the front panel gently
  2. You should see the front panel exposed

  1. Again Gently detach the keyboard by pushing it upwards and then outwards towards you
  2. Do not pull the keyboard there is a flat cable still attached to it

  1. If you need to replace the keyboard this is it
  2. Continuing you should see 2 wires (left and right) running from the LCD through the hinge

  1. Gently pull (just a bit will do) and loosen the wires to ensure the wires are not strained at the hinge part so when you close the lid the wires will not be strained
  2. Remember to tighten the connectors while you are at it
  3. Replace everything and reboot
The Picture below therefore should be the antenna of the Atheros Wireless Card

___________________________________________________________________
Additional Pictures of Internal Ports

Saturday, January 24, 2009

Nvidia PowerMizer

PLEASE NOTE:
Since Nvidia driver Geforce version 185.XX, perflevelsrc is no longer used for controlling GPU throttling.
In Driver Version 19X.XX the GPU performance control is in the control panel.

If your graphics card is running overheating frequently when monitored using HWMonitor and you happen to be using Nvidia Graphics this post is for you

Note:
PowerMizer is a feature created by Nvidia to save power and reduce heat on Graphics Card
PowerMizer is built into all the graphics card
It is optional for Desktops because Desktops have infinite power from Wall Sockets and manage heat well
However it is very essential for Notebooks as they have to conserve power and produce less heat when no intense graphical application is running

Run “Regedit”

Go HKEY_Local_Machine\SYSTEM\CurrentControlSet\Control\Video\{ Your graphics adapter}000 and 0001

To locate the registry entry expand all the entries until you see one with lots of registry setting That will be the the registry containing your Graphics Options


Right click on the right Window to create a new DWORD 32bit value
The value name change to “PowerMizerEnable” value select “1″ in hexidecimal
Repeat
The value name change to “PerfLevelSrc” value data “3333″ in hexidecimal


Reboot
Verified using GPUZ and HWMonitor

The Result

After PowerMizer is activated successfully you should see the GPU Clock drop below default clock at idle

Optional:

If you want finer control over PowerMizer change “PerfLevelSrc” values to achieve desired effect

  • PerfLevelSrc=0×2222 - fixed PowerMizer mode (and appropriate fixed frequency) is used for battery power source and fixed PowerMizer mode is used for AC power source, these PowerMizer modes may be the same or different
  • PerfLevelSrc=0×2233 - fixed PowerMizer mode is used for battery power source and adaptive clock frequency strategy is used for AC power source
  • PerfLevelSrc=0×3322 - fixed adaptive clock frequency strategy is used for battery power source and PowerMizer mode is used for AC power source
  • PerfLevelSrc=0×3333 - adaptive clock frequency strategy is used for battery and AC power sources